How To – Make a “V” Appliance
For my audition for Face Off Season 2 on SyFy, I needed to apply an appliance that I made, and I needed to apply it in under 15 minutes. It needed to make me into someone else, and after much debate, I decided to go for a half face torn open with lizard skin underneath. Basically, an homage to the TV series V, as well as an homage to Face Off, since half my Face would be…. well… Off.
I didn’t have a lot of time to make it, and it needed to be as simple as possible if I was going to be able to apply it in under 15 minutes.
I started off with a lifecast of myself from a few years back and some oil based clay.
If you don’t have a lifecast, you can use a mannequin head.
I sculpted the piece pretty quickly, the hardest part was getting the lizard scales aligned, but I think it came out pretty sweet!
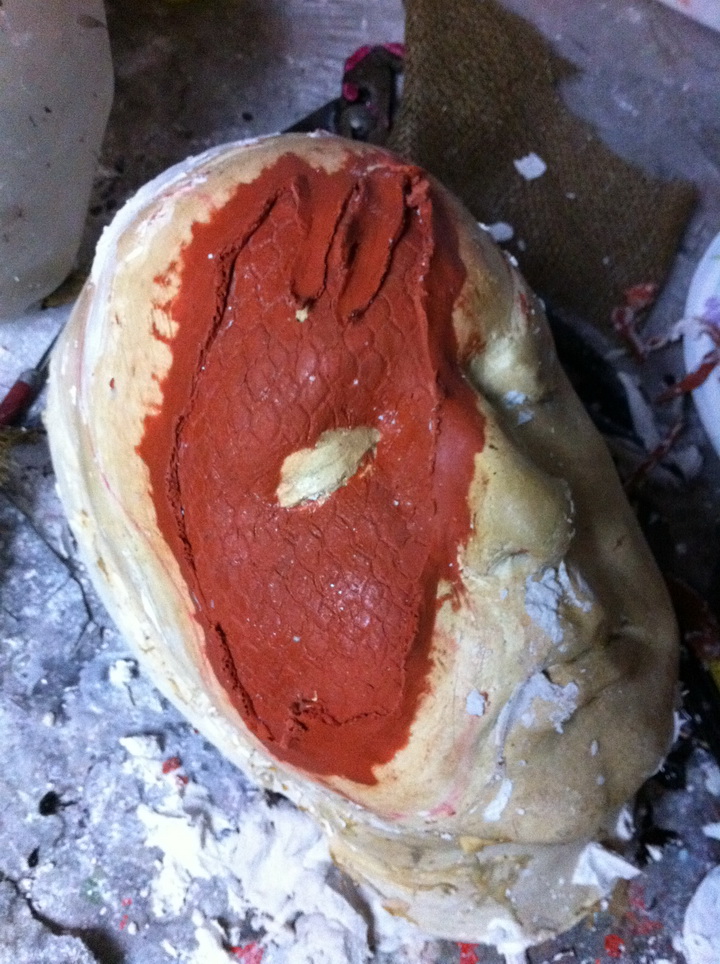
Once I had it looking the way I wanted, built a small clay wall around the outer edge of the appliance to keep the plaster from getting everywhere.
The next step was to coat everything with Vaseline. The Vaseline keeps the plaster mold that we’re about to pour from sticking to the plaster face, and makes sure the clay comes out of the mold more easily later.
As I was under the gun, I used whatever plaster I had laying around, which happened to be Plaster of Paris. It’s not the best choice, but it will do in a pinch! The optimal choices are Hydrocal or UltraCal. But I didn’t have time to run out and get some.
I mixed up the plaster and coated the sculpt with about 2″ of plaster. I normally would have done a thin, watery coat of plaster to make sure that there are no air bubbles, but again, I was rushed, so I molded it in one thick coat.
Once the mold cured, I popped it open, removed the clay, and started to prep the foam latex.
Running foam is an art form in itself. I pick my foam up from Monster Makers. Be careful with the foam. It’s an ammonia based latex product, so be sure to mix it only in a well ventilated space, and while wearing safety gear! Be sure to have eye protection, rubber gloves and a quality filter mask.
To run foam, you need the foam, which is a 5 part kit, and a mixer. Mix the foam as per the instructions (each part gets measured by weight), at different speeds for specific lengths of time. The 5th part of the kit is the mold release. Make sure you use that on both the lifecast AND the inside of the mold. I also like to spread it on the outsides of the mold in case of spillage.
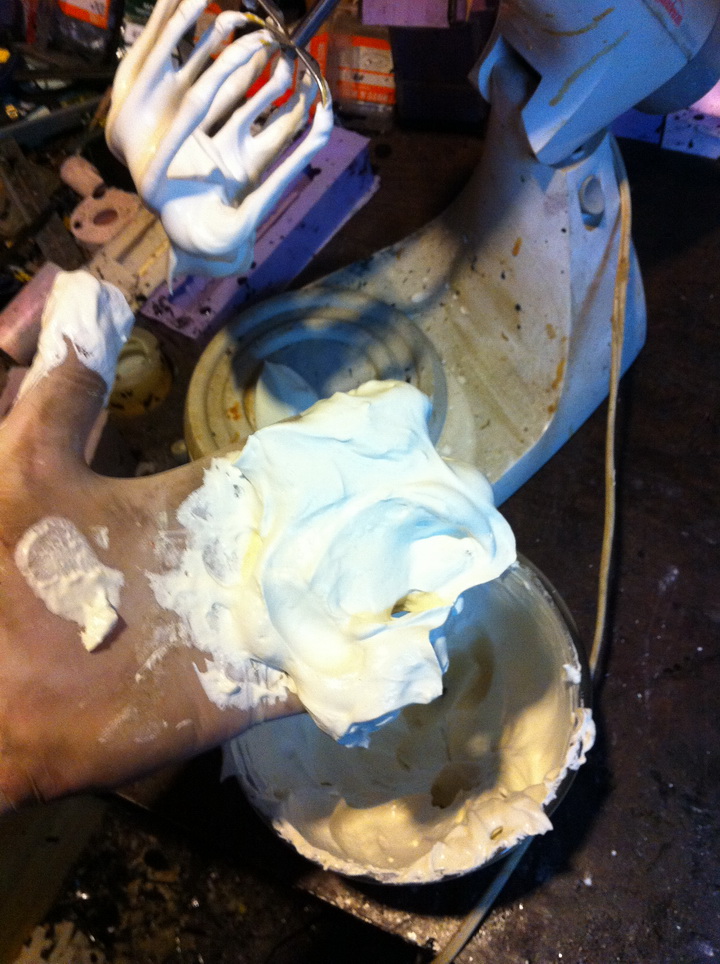
After about 15 minutes of mixing the foam, it’s time to add in part 4, the gelling agent. This is what actually makes the foam gel and gets it ready for getting into the mold.
This is what foam latex looks like when it’s fluffy and ready to go into the mold!
So, once the foam is ready, you’ll have between 3 and 10 minutes to get it into the mold. Press it in carefully, making sure to get it into all the nooks and crannies. I also wipe the lifecast down with the foam, just to make sure everything is coated.
Now you take the mold, press it onto the lifecast, and squeeze all the excess foam out from between them.
Basically, since you scraped the clay off the lifecast, the mold has a hollow cavity in the shape of the clay sculpt. The foam fills that space and becomes the appliance.
Once the foam is in, preheat your oven to 200 degrees and pop the mold in. Let it bake for 3-4 hours, then turn off the oven and let the mold sit for an hour. The open the oven door and let the mold cool for about an hour.
The downside to all of this is that baking foam latex stinks of rotten eggs. And you will not want to eat anything out of that oven again!!
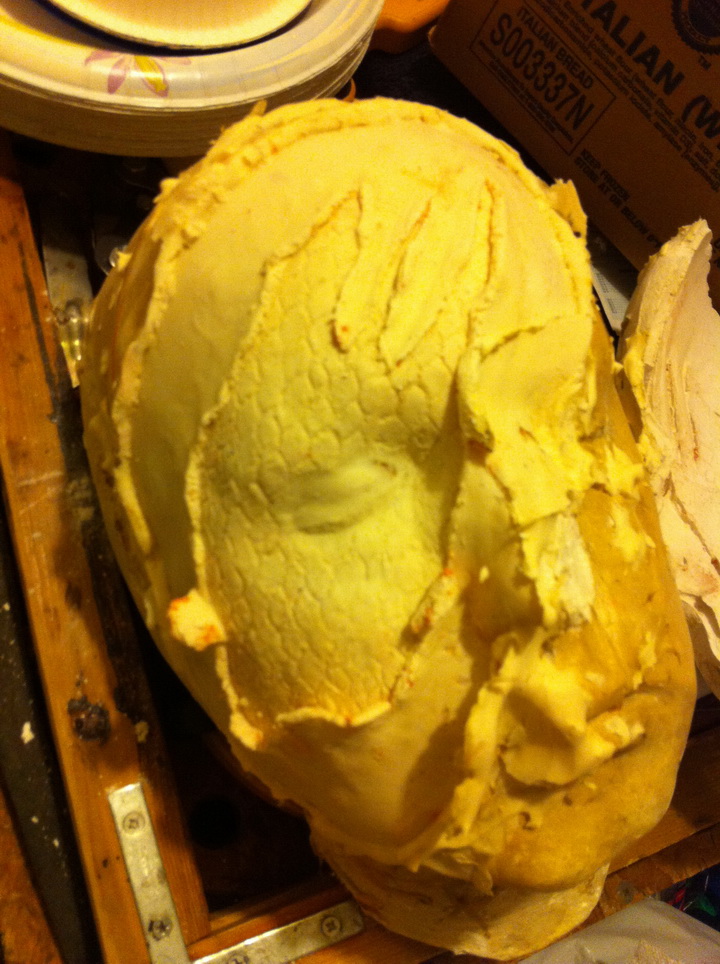
Gently open the mold once it’s cooled down and be sure to sprinkle in some baby powder as you open it. The fresh latex will immediately try and stick back to itself, unless the baby powder hits it and absorbs the last of the moisture in the foam.
And here’s the raw pull right out of the mold!
The next step is to wash the foam to get rid of the mold release and the rotten egg smell. Wash it in warm, soapy water and let it dry.
Once it’s dry, it’s time to trim the appliance down to size.
Use a small, sharp pair of scissors and carefully trim the edges of the appliance to get it down to the correct size.
Once that’s done, it’s time for painting!
The best paint to use on a latex appliance is…. latex based paint!
In this case, I used acrylic paints from a craft store and mixed it with Pros Aide, which is a latex based adhesive that we’ll be using later on to attach this to your face. Mix a little Pros Aide with the acrylic, and that will make sure that the paint not only adhere well, but won’t crack or peel.
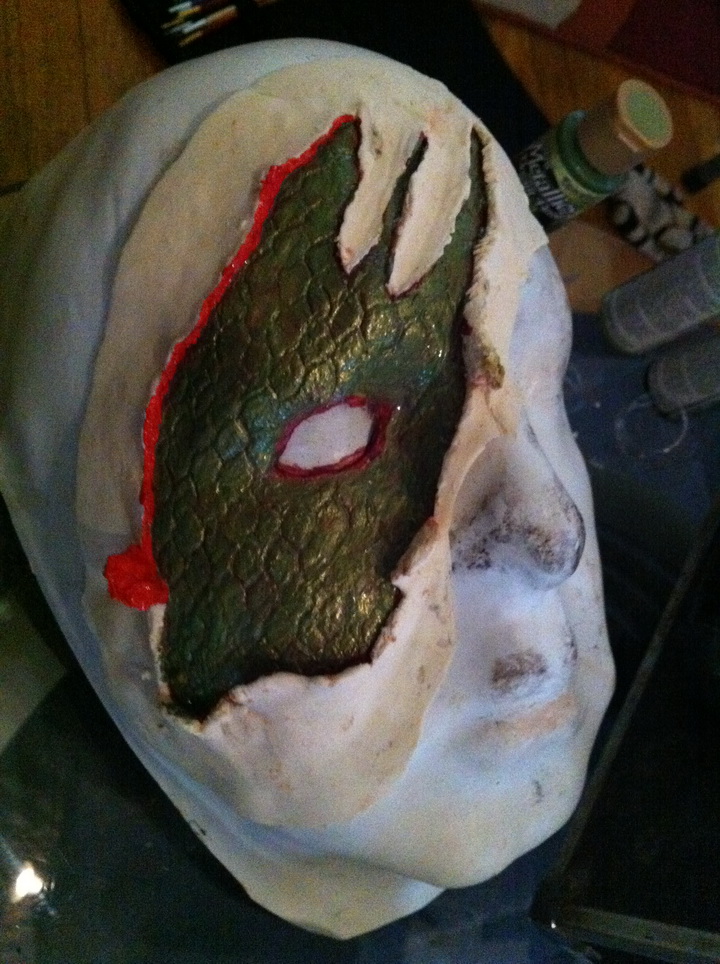
I used a brown to get into the small lines in the lizard skin texture, and around the eye. When that dried, I went over all the lizard skin with a light green. And once that was dry, I went over that again with a green metallic paint to give it that sheen.
I then used some True Red paint to get into the gory bits at the edges.
I tried to make sure I was careful not to get any paint onto the “skin” part on the outside, as it will be tough to paint over it and get it to blend to your skin later.
Also, try not to get any red paint onto the green skin part. It’s not too big of a deal if you do, but it’s best if you try hard not to!
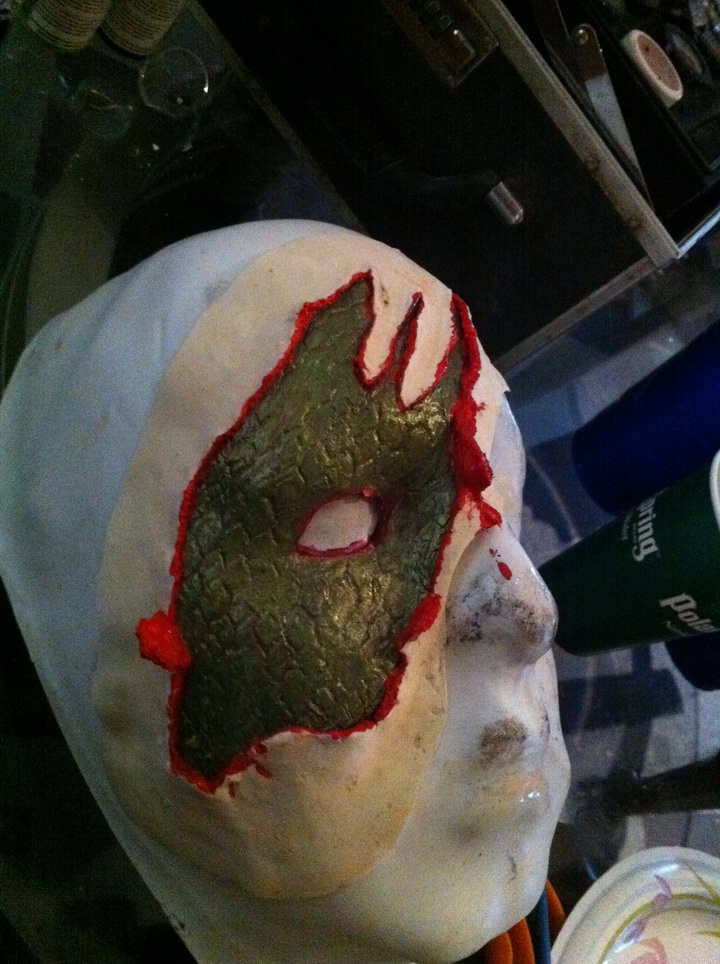
The next step is to seal in the red paint and give it a nice sheen.
I use a clear latex paint called “Perma Wet”. It dries clear, but glossy. It’s perfect if you want something to be glossy, and sealed in.
I was going to use it on the green skin part as well, but I was so happy with the sheen it had already, I chose to leave it alone.
When you first apply the Perma Wet, it looks very milky, and you may worry that you just ruined the appliance, but I assure you, it dries clear and glossy. So don’t worry!
Let that dry for an hour or two until it’s no longer milky, and then we can move on to the next step.
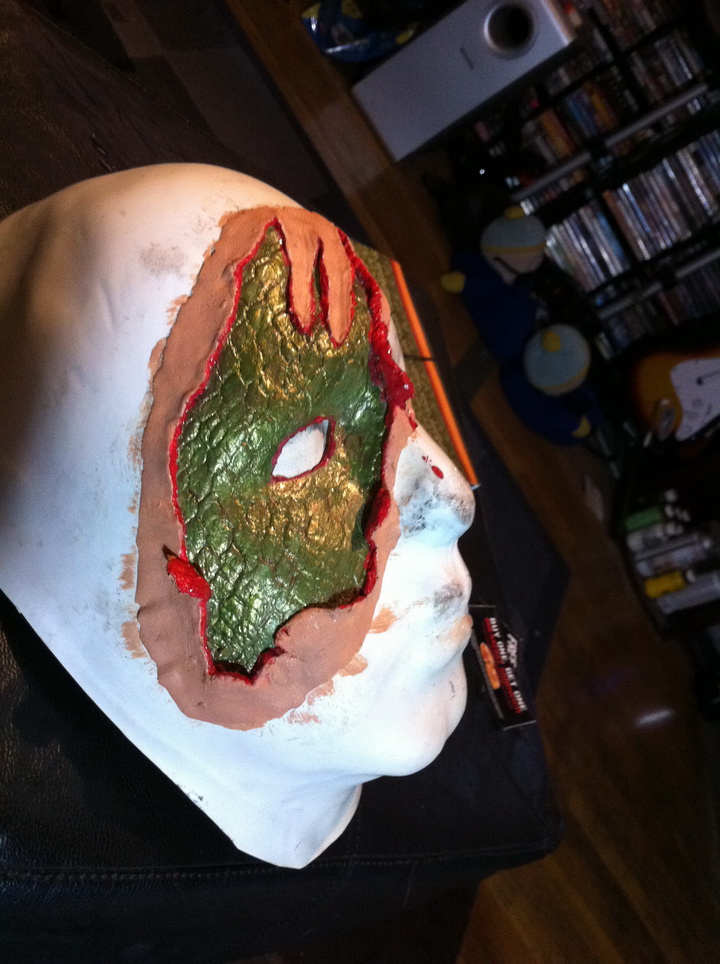
Skin Tone Applied
Next it was time to do the skin tones on the appliance. Normally I would do this after it was applied to someone, but since I would only have 15 minutes to apply this, I chose to pre-paint it.
I painted it with regular liquid make-up from the drug store. It goes on foam latex very well, it’s cheap, and it matches skin very well.
I painted all around the appliance, knowing that it still needed a final trimming down to be perfect.
I was lucky to find a make-up that matched my skin tone really well. This would make it a lot easier later when I needed to blend this.
Time to test fit!
Here’s the appliance placed on my face, but not glued down.
I decided to try out the Cat-Eye contact lens for this! Thankfully I found an unused set in my shop!
So by testing it like this, I was able to find areas of the appliance that I could trim down even more to make it easier to blend it later.
After three or four tests like this, I had it sized to where I wanted it and I was ready to head to the audition!
To apply this, all I needed was some Pros-Aide, the make-up to blend it to my skin, some brown grease paint for my eye, and some home-made blood!
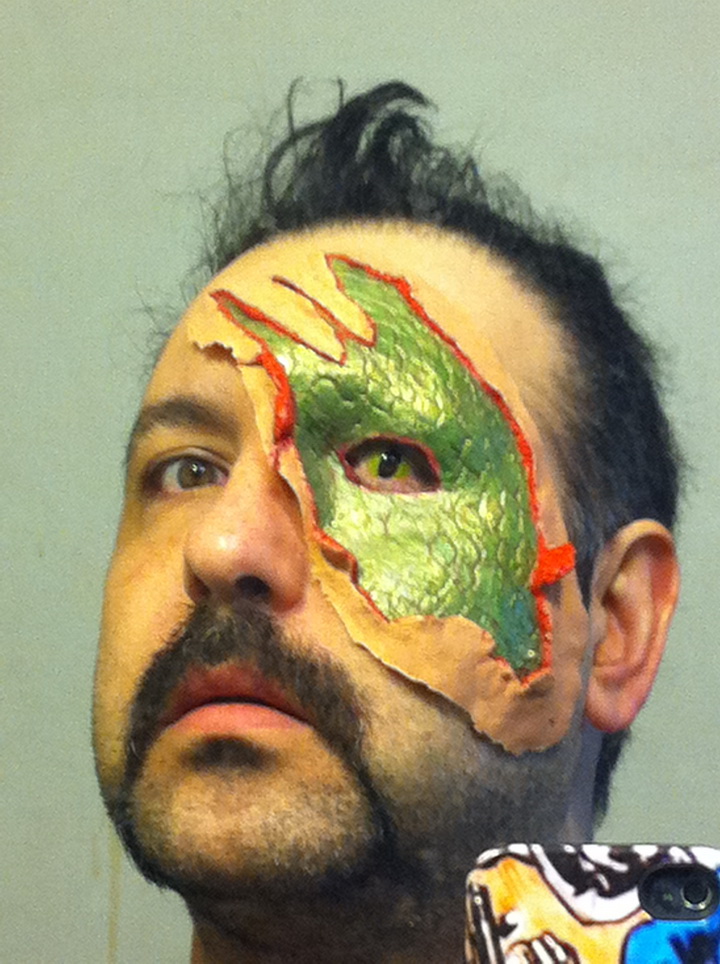
So, the time came, they gave us 15 minutes to get our make-up applied, and here’s what it looks like all done!
Applied and done in under 15 minutes!
Sweet!
Realistically, this is a piece that could be made in one day, and for well under $100.
It’s a great piece, and would look great if you had an old school “V” uniform!
Oooh, now time to piece together one of those!!
So, here’s the full list of everything you need:
Lifecast or Mannequin Head
Clay
Sculpting Tools
Vaseline
Foam Latex
Plaster
Electric Mixer
Gloves
Respirator Mask
Eye Protection
Scissors
Acrylic Paints
Pros-Aide
Make-up for blending to your skin tone
Fake Blood
Cat-Eye Contact Lens
Hope that helps! And remember, don’t try this at home!


2 Comments
I was wondering if you had a mixer… it’s just in the wrong room 🙂
and “The downside to all of this is that baking foam latex stinks of rotten eggs. And you will not want to eat anything out of that oven again!!” really??? uh=oh…
Very interesting read, subscribed.